Originally presented February-April 2026 for the Association of University Centers on Disabilities’ Community Education and Dissemination Council (CEDC).
ProTip: Use the Table of Contents above (also available as a tab at the top left of your screen) to jump to the information you need quickly.
Overview
Universal design is a concept that we can use to help make sure the materials we create are accessible to everyone. In our sessions this quarter, we’ll look at how we can apply universal design and accessibility principles to Microsoft Word and PDF documents. By incorporating these ideas from the beginning, we can be proactive rather than reactive in providing accessible materials. This spring, rules changes to the Americans with Disabilities Act (ADA) require institutions to be proactive. What are these new rules, and how can your program comply?

Your presenter
Ryan Creech
Technical Assistance Coordinator
University of Kentucky Human Development Institute
ryan.creech@uky.edu
The POUR principles of accessible design
The original Web Content Accessibility Guidelines (WCAG) were published in May of 1999. The guidelines are maintained by the World Wide Web Consortium (W3C). The goal of WCAG is to explain what accessibility means, provide guidelines and criteria to make sure you are building accessible content, and to help creators succeed by giving advice on methods for making their stuff better.
According to WCAG, accessibility is defined by the four POUR principles. You can read their descriptions of the four POUR principles on the WCAG website, but here’s the list:
- Perceivable: Your audience can use their senses to take in your materials.
- Operable: People should be able to interact with your files or app no matter what device they use or what their abilities are.
- Understandable: Your content should be clear, predictable, and consistent.
- Robust: Follow best practices to make things compatible with different browsers and assistive technologies.
Perceivable

When you build materials that are perceivable, you present information in ways that can be used and recognized no matter what senses they use or how they consume content.
Think about ways your materials might be used. For example, imagine one member of the audience is colorblind. Or say you are sharing things with office workers; they might not be able to print things in color. This is why you shouldn’t use color alone to share your message! Read more later in the section on color.
Operable

In operable content, controls and information are easy to navigate and use, no matter how someone interacts with it.
You just can’t predict who is going to use the things you create. You need to check to make sure that you aren’t leaving folks out! Here are a couple of examples of bad operability:
- An online job application with a Next button to click that is not accessible with the keyboard
- A game that won’t work without a touch screen
- A computer program with complicated keyboard shortcuts. For example, Windows users with Office can press
Ctrl + Alt + Shift + Win + Wto create a blank Word document.
Understandable

Understandable content makes it easy for people to understand information and how to complete tasks.
Your content should be easy and comfortable to find. Users should be able to figure out what you are going for by looking for familiar patterns. Try to use simple terms. When possible, don’t use a lot of idioms or expressions. When you are talking to families, limit and explain your use of:
- Technical jargon (decoding, processing, neurodivergent)
- Specialized vocabulary (community living, discretionary funding, generative artificial intelligence)
- Abbreviations (ABLE account, LRE, FAPE, HCBS)
Robust

If your content is robust, it is accessible across software and devices. It should work reliably now and in the future, even as technology changes.
The best way to make sure your materials are robust is by testing them! Try accessing your center’s website on a desktop PC, a tablet, and your mobile phone. What does the page look like? How does the layout change on different screens? Do you lose some information?
Laws and regulations
In the United States, we have a robust series of Federal laws that protect people with disabilities from discrimination. Sections 504 and 508 of the Rehabilitation Act, along with the Americans with Disabilities Act (ADA), spell out what is required of public colleges and universities. Both Section 508 and the ADA incorporate the Web Content Accessibility Guidelines (WCAG) by reference as their accessibility standards.
- Rehabilitation Act of 1973 – Applies to Federal agencies and their contractors. Sometimes required for grantees.
- Americans with Disabilities Act (ADA)
- Web Content Accessibility Guidelines (WCAG) 2.1
2024 ADA changes
In 2024, the US Department of Justice issued new ADA regulations that directly affect Title II agencies (89 FR 31320). Title II agencies are state and local government entities, including public universities, community colleges, and state higher education systems. Essentially, the changes require programs to take a proactive approach to making their digital materials accessible rather than fixing them on request.
These new rules mean that websites, mobile apps, course materials and learning management systems (LMS) must be compliant with Level AA of the Web Content Accessibility Guidelines (WCAG) 2.1. There are rolling deadlines based on the size of the agency. Note that public universities and community colleges are required to comply based on the number of people served by their state or local government rather than their enrollment numbers.
Exceptions
The ADA notes that some content has to be exempt from the new requirements in order to meet their accessibility deadline:
It is important that state and local governments can prioritize so they can choose the most important content—like current or commonly used information—to make accessible to people with disabilities quickly.
There are limited exceptions for some kinds of content that are not as frequently used or that may be particularly hard for state and local governments to address right away.
Possible exceptions include:
- Archived web content
- Preexisting conventional electronic documents
- Content posted by a third party where the third party is not posting due to contractual, licensing, or other arrangements with a public entity
- Individualized documents that are password-protected
- Preexisting social media posts
To learn more about the exceptions and how they might affect your organization, visit the ADA’s Fact Sheet on the New Rule on the Accessibility of Web Content and Mobile Apps Provided by State and Local Governments .
Sources and additional reading
- Bennett, M. (2024, June). New digital accessibility rule for public schools, community colleges, and public universities . United Educators. Retrieved February 18, 2026 from https://www.ue.org/risk-management/nondiscrimination-and-accessibility/new-digital-accessibility-rule-for-public-schools-community-colleges-and-public-universities/
- Department of Justice. (2024). Nondiscrimination on the Basis of Disability; Accessibility of Web Information and Services of State and Local Government Entities , 28 C.F.R. Part 35 (CRT Docket No. 144; AG Order No. 5919‑2024; RIN 1190‑AA79). Federal Register, 89(80), 31320–31396. Retrieved February 18, 2026 from https://www.govinfo.gov/app/details/FR-2024-04-24/2024-07758
- Department of Justice. (2024, March 8). Fact sheet: New rule on the accessibility of web content and mobile apps provided by state and local governments . ADA.gov. Retrieved February 18, 2026 from https://www.ada.gov/resources/2024-03-08-web-rule/
- Gibson, D. (2025, April 22). New ADA Title II web accessibility requirements hit April 24, 2026 . Accessibility.Works. Retrieved February 18, 2026 from https://www.accessibility.works/blog/ada-title-ii-2-compliance-standards-requirements-states-cities-towns/
- Sohal, A. (2025, November 6). DOJ to Revisit ADA Title II and III and What It Means for Digital Accessibility | Pivotal Accessibility . Pivotal Accessibility. Retrieved February 18, 2026 from https://www.pivotalaccessibility.com/2025/11/doj-to-revisit-ada-title-ii-and-iii-and-what-it-means-for-digital-accessibility/
Your content should be easy and comfortable to find. Users should be able to figur
If your content is robust, it is accessible across software and devices. It should work reliably now and in the future, even as technology changes.
The best way to make sure your materials are robust is by testing them! Try accessing your center’s website on a desktop PC, a tablet, and your mobile phone. What does the page look like? How does the layout change on different screens? Do you lose some information?
Laws and regulations
In the United States, we have a robust series of Federal laws that protect people with disabilities from discrimination. Sections 504 and 508 of the Rehabilitation Act, along with the Americans with Disabilities Act (ADA), spell out what is required of public colleges and universities. Both Section 508 and the ADA incorporate the Web Content Accessibility Guidelines (WCAG) by reference as their accessibility standards.
- Rehabilitation Act of 1973 – Applies to Federal agencies and their contractors. Sometimes required for grantees.
- Americans with Disabilities Act (ADA)
- Web Content Accessibility Guidelines (WCAG) 2.1
2024 ADA changes
In 2024, the US Department of Justice issued new ADA regulations that directly affect Title II agencies (89 FR 31320). Title II agencies are state and local government entities, including public universities, community colleges, and state higher education systems. Essentially, the changes require programs to take a proactive approach to making their digital materials accessible rather than fixing them on request.
These new rules mean that websites, mobile apps, course materials and learning management systems (LMS) must be compliant with Level AA of the Web Content Accessibility Guidelines (WCAG) 2.1. There are rolling deadlines based on the size of the agency. Note that public universities and community colleges are required to comply based on the number of people served by their state or local government rather than their enrollment numbers.
Exceptions
The ADA notes that some content has to be exempt from the new requirements in order to meet their accessibility deadline:
It is important that state and local governments can prioritize so they can choose the most important content—like current or commonly used information—to make accessible to people with disabilities quickly.
There are limited exceptions for some kinds of content that are not as frequently used or that may be particularly hard for state and local governments to address right away.
Possible exceptions include:
- Archived web content
- Preexisting conventional electronic documents
- Content posted by a third party where the third party is not posting due to contractual, licensing, or other arrangements with a public entity
- Individualized documents that are password-protected
- Preexisting social media posts
To learn more about the exceptions and how they might affect your organization, visit the ADA’s Fact Sheet on the New Rule on the Accessibility of Web Content and Mobile Apps Provided by State and Local Governments.
Sources and additional reading
- Bennett, M. (2024, June). New digital accessibility rule for public schools, community colleges, and public universities. United Educators. Retrieved February 18, 2026 from https://www.ue.org/risk-management/nondiscrimination-and-accessibility/new-digital-accessibility-rule-for-public-schools-community-colleges-and-public-universities/
- Department of Justice. (2024). Nondiscrimination on the Basis of Disability; Accessibility of Web Information and Services of State and Local Government Entities, 28 C.F.R. Part 35 (CRT Docket No. 144; AG Order No. 5919‑2024; RIN 1190‑AA79). Federal Register, 89(80), 31320–31396. Retrieved February 18, 2026 from https://www.govinfo.gov/app/details/FR-2024-04-24/2024-07758
- Department of Justice. (2024, March 8). Fact sheet: New rule on the accessibility of web content and mobile apps provided by state and local governments. ADA.gov. Retrieved February 18, 2026 from https://www.ada.gov/resources/2024-03-08-web-rule/
- Gibson, D. (2025, April 22). New ADA Title II web accessibility requirements hit April 24, 2026. Accessibility.Works. Retrieved February 18, 2026 from https://www.accessibility.works/blog/ada-title-ii-2-compliance-standards-requirements-states-cities-towns/
- Sohal, A. (2025, November 6). DOJ to Revisit ADA Title II and III and What It Means for Digital Accessibility | Pivotal Accessibility. Pivotal Accessibility. Retrieved February 18, 2026 from https://www.pivotalaccessibility.com/2025/11/doj-to-revisit-ada-title-ii-and-iii-and-what-it-means-for-digital-accessibility/
Document formats
In this course, we’re exploring accessible text communication. For many professionals, the workflow looks something like this:
- Create a document in Microsoft Word (easy to format and create)
- Export document to a PDF (opens easily for users)
- Share PDF document via website or email
For years, folks have been pushed to share everything as a PDF. A question I hear often is “Which format is the most accessible?”. The short answer is, “It depends”. Let’s look at the pros and cons of sharing documents in each format and some tips of when to use each one.

Microsoft Word (.docx)
A lot of us prefer to create documents in Microsoft Word. It’s the most common word processing software and is packed with features that help you make pretty, usable documents without a lot of technical know-how.
Reasons to share your documents in Word format
- You know your audience has access to Word. This applies when you are sharing information within your unit or organization.
- Readers need to change or edit large chunks of the document.
- The visual layout of the information is not important. Things don’t need to be forced to a specific format or number of pages.
If you decide to share your Word document:
- Use Word’s built-in Styles when creating your documents. They allow you to create documents with identified headings that make it more navigable. Open the Navigation pane by going to the View tab in the ribbon and choosing it from the Show group. Here, you can see the structure of headings in your file.
- Be sure to use the Accessibility Checker for a basic check. Visit the Review tab of the ribbon and choose Check Accessibility from the Accessibility group.
- Save your file with a meaningful name that conveys its purpose and context.
- Make sure that your document has a title property by accessing the File tab in the ribbon and select Info from the menu on the left.
Reasons NOT to share your documents in Word format
- Your document requires a signature.
- Your audience needs to print your document.
- You need to share a complex form or fillable document.
- Readers will refer to your document often and need to find things quickly, like in a reference guide.
- You are sharing the document with the public or an unknown audience who may or may not have access to Word.
Portable Document File (.pdf)
Over the last several years, the PDF has gained a reputation as the most accessible document format. A PDF gives you very flexible tagging and interactivity options that are more accessible than their Word counterparts. PDF remediation – editing the document to fix accessibility problems – can be intimidating for a lot of people.
A key idea to keep in mind is that a PDF was made for print documents. A PDF preserves the content, layout, spacing, and fonts for the entire document. When a reader opens the file, the PDF reader can reconstruct the file using those assets. That means that a PDF should look exactly the same no matter what technology the user uses.
Reasons to share your documents in PDF format
- You’ve spent a great deal of time designing your flyer or handbook and the layout and table of contents are integral to using it.
- You have a document that needs to be signed or that needs added security features.
- You’ve assembled a graphic novel, catalog, or other very visual medium.
- You’re sharing a document publicly. All of the major browsers can display PDFs without any additional plugins or apps.
- Users might need to print it, download it for later, or fill it in (like a form).
- You have complex tables. Microsoft Office can’t handle complex table markup properly, although it’s fine for regular tables.
If you decide to share your PDF document:
- Be sure to use the built-in accessibility checker for a basic check. Open the All tools menu and select Prepare for accessibility. Choose the Check for accessibility option from the submenu.
- If you’re still getting used to Acrobat, or if you are looking to save some time on big batches of files, be sure to check out the section on Adobe Acrobat Preflight under Expanded training and resources below.
- You can use a 3rd party software to verify that your PDF is fully compliant with WCAG and PDF/UA standards. At HDI, we use the PDF Accessibility Checker (PAC). PAC was created by the German Federal Ministry of Labor and Social Affairs and gets updates as the specifications change.
- Save your file with a meaningful name that conveys its purpose and context.
- Make sure that your document has a title property. Open the Menu in Adobe and choose Document Properties (near the bottom or with keyboard shortcut
Ctrl + D). You’ll find the Title field on the Description tab. Once that’s set, switch to the Initial view tab. In the Window Options group, selectDocument Titlefrom the Show dropdown (the default isFile Name).
Reasons NOT to share your documents as a PDF
- Your users need to be able to edit or make additions to the document. Acrobat can be incredibly difficult to use for making content changes.
- Remediation requires a learning curve (which includes good source documents).
- Creating a tagged PDF in Windows means using Adobe Acrobat. It can be cost-prohibitive for small agencies or offices.
Natively online (HTML, email, WordPress)
As programs grow and more content gets offered online, we’ve all had to become experts ats authoring for digital media. Whether we’re updating the department’s page using Drupal or WordPress, creating a newsletter with MailChimp or Campaign Monitor, or doing social media posts for Facebook or Bluesky, we want to make the information available to everyone without making them jump through hoops.
Using formats like Word or PDF gives you more control over the final look of your page. But what if what you are sharing is purely informational? What if you aren’t as worried about the visual, but simply want to communicate to your audience?
Reasons to share your documents in a natively online format
- You respect your readers’ time and don’t want them to have to download (or re-download) your user guide every time they want to see which setting to use for steaming silk.
- Your company pays for advanced features like Microsoft’s Immersive Reader that help students customize the presentation of class materials.
- You have a community whose members might not be technologically savvy. They might not have good internet service, printing hardware, or might use public computers at the library to get online.
- You want your audience to have control over how the content is displayed. Native formats allow the user to use their preferred font, font sizing, colors, and contrast settings.
If you decide to share your information in a natively online format:
- Familiarize yourself with built-in enhancements like headings (read more about headings below).
- Make sure your links have unique, specific text that conveys the target and purpose.
- Always send email using HTML format to ensure proper tagging is applied.
Reasons NOT to share your documents in natively online formats
- Your aim is to grab your readers’ attention in a visual way, like putting up flyers around campus.
- You have multiple documents from many sources that you’re trying to combine.
- You don’t want visitors to have the ability to bookmark your site to return later.
Ryan’s coworker demonstrates what not to do
A coworker, Shelly, was in charge of planning our yearly staff get-together. It was to be a terribly exciting day of speeches and presentations with a fancy catered lunch in the middle. They were tasked with sending the menu out to the staff so we’d know what to expect. Shelly:
- Created a bulleted list in Microsoft Word
- Exported the Word Document as an untagged PDF
- Emailed the team with the PDF attached. The body of the email said “Please see the attached PDF for the lunch menu. Can’t wait to see everyone!”
Shelly could have saved time and effort and delivered a far more accessible product by entering the bulleted list in the body of the email! They absolutely could have included a pretty, print-ready version as an attachment if that was important, but this was black text on a white page. A user relying on a screen reader due to blindness or an executive functioning or visual impairment might’ve discovered the attachment, but they wouldn’t have been able to read it.
This menu caused problems for sighted users, too. Shelly inadvertently made the communiqué less accessible by complicating the process. They’d heard that PDF was the best choice for sharing accessible documents.
- What happens if the menu needs to be changed?
- What if someone opens the email for a quick read on a phone or tablet and doesn’t want to download a large file?
- What if someone points out the untagged PDF and Shelly corrects it? Will she have to send a whole new email instead of updating the website?
If an attendee has a serious food allergy but can’t access the menu email, they could wind up in danger. Other people might miss the fact that lunch is being provided entirely!
Structure and readability
Including headings in your document and being intentional about the fonts and typefaces you choose can make your document substantially more useful for people with and without disabilities. Check out the screen reader navigation videos below for some real-world examples.
Headings
Your document’s headings provide structure. Word and Adobe support tagging your headings out of the box. In Word, you can set up specific Styles using the Styles Manager to keep consistency throughout your document(s). They help your audience see how materials are related to each other. The WCAG & web standards mean you are usually limited to heading levels 1-6.
Users can access Word’s Navigation pane by selecting the View tab on the ribbon. The Navigation pane acts like a map to your document, providing links to each section. It makes it easy for readers of long documents to keep an eye on their progress.
Font selection
Changing the default font can make your print or electronic document more readable for everyone. Font choices are subjective; use what you think looks best but ask someone else to weigh in on your choices.
- Sans-serif fonts like Open Sans, Roboto, and Arial are much easier to read as body text, especially with longer digital documents, as compared to serif fonts.
- Serif fonts like Times New Roman, Frank Ruhl Libre, or Playfair Display can be a good choice for titles and headings. Serif fonts are preferred for longer printed documents.
- Avoid overly decorative fonts like Comic Neue, Abril Fatface, Yellowtail, or Rubik Glitch. They can be used sparingly for logos or special text but should be accompanied by a more readable version.
Text size and formatting
Generally, the base document font should be size 12-14pt for body text and 18-20pt for headings. Experiment with your font’s weight (light, regular, bold), kerning (the amount of space between letters), word spacing, and line spacing to find something practical that communicates your message.
- Text should be left-aligned or justified if possible so that it can be scanned easily.
- For best readability, limit your use of italics.
What is a “12 point font”, anyway?
In typography, “pt” stands for “point”. It is a unit of measure used to specify font size. One point is equal to approximately 1/72 of an inch or 0.351 millimeters. Using the point system provides a standardized way to specify and compare font sizes accurately across different fonts, mediums, and resolutions. It allows designers and developers to have precise control over the appearance and legibility of text.
When you see “12pt font”, it means the font size being referred to is 12 points (or 1/6 of an inch) tall. This is a relatively small font size often used for body text in print publications or on the web.
Textual alternatives
Users with disabilities or technical limitations might not get the full effect of the visual elements in your materials. It’s important to add textual alternatives, commonly referred to as alt text. Alt text explains the content and purpose of your visual aids.
Alt text fills in extra context for your readers. For non-visual users, it’s what they’ll receive instead of your media content. It’s also indexed by search engines and displayed on the page if items fail to load.
When you’re writing alt text:
- Keep it descriptive, simple, and short. Leave out creative interpretations, analogies, and non-objective details; save those for the actual page content.
- Avoid repeating information that’s already available in the surrounding text. Descriptors like “image of” or “picture of” aren’t necessary.
- Focus on the content. Alt text is not the place to add a source credit, link, or extra information that a user who isn’t using assistive technology might miss.
 For functional images, describe the function rather than the appearance. Rather than describing an image as “a black arrow pointing left on a white circle”, just use “previous page”.
Images
Text alternatives – commonly known as alt text – are a common, easy implemented way to make your content available to more people. They give you the opportunity to describe images and links for people who can’t see or understand them properly. When you add an image to your document, ask yourself these questions:
- Why have I included an image here? You could have shared the same ideas using text. Why add the image at all? Is it to add context, or does it just make the content more eye-catching?
- What information does the image add or summarize? Does it help to show the results of your research? Does it help set the mood for this section of the document?
- Why did I choose this specific image? You could have used any number of images to share this info. Why did you choose this image? Why did you show a classroom rather than a dorm, or a close-up shot of a professor?
- What story do I want my image to tell? How does the image enhance the content?
Good alt text depends on the image and its purpose. For images that are included for visual attention, you can mark them as decorative. This means that screen readers and other assistive technologies will skip the image entirely.
Links
Hyperlinks in your document also need descriptions. You can add Tooltips to links in Word, alternative text for links in Acrobat, or link titles in your natively online content. Even better, set your link text to include the target and purpose of the link! Each link in your document should:
- Have a descriptive name
- Have a unique name (unless they go to the same place)
- Not use the URL as text
- Avoid link texts which require surrounding context to understand
Check out the screen reader videos below to see unique and descriptive link text in action.
Color
Color contrast
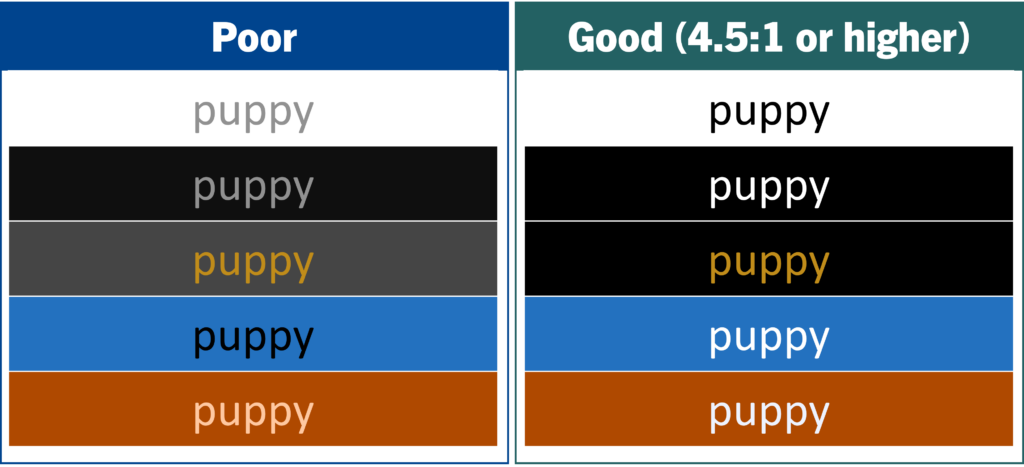
Contrast is the difference in brightness between 2 colors. When you’re creating documents, emails, or web pages, you’ll want to make sure that the text and background colors are different enough to see easily. We measure contrast as a ratio; the higher the ratio, the better the contrast. Text in your document should have a contrast ratio of at least 4.5:1 compared to the background color.
The image below shows examples of poor (failing) color contrast alongside good (4.5 to 1 or higher) contrast. Are there combinations on the left that you think are easier to read than those on the right?
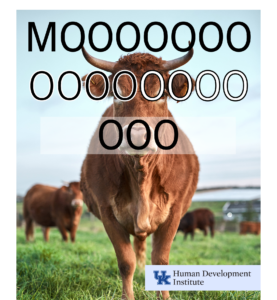
Text over images
Sometimes, your text is over an image rather than a colored background. The same contras minimums apply if the text in your image is meaningful to the content.

Color contrast testing tools
Color contrast is an important consideration. Take a look at these free tools that allow you to check the contrast of elements as part of your workflow:
- WebAIM: Contrast Checker
- Color contrast checker analyzer tool | Adobe Color
- Colour Contrast Analyser (CCA) – TPGi
Using color to organize information
Don’t use color alone to show information. Check out the school behavior charts below as an example. They are set up just alike: tables with two columns each, one with the day of the week and the second with reported behavior for the day. In all cases, good days are displayed as green while bad days are indicated in red. If the student’s caretaker were colorblind, for example, or if a copy is made on a black and white copier, the color information gets lost.
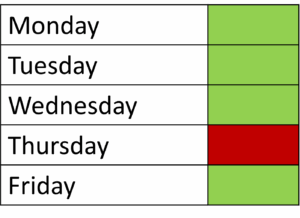
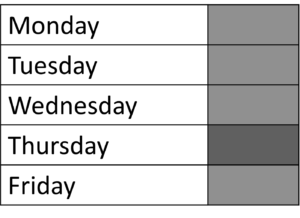
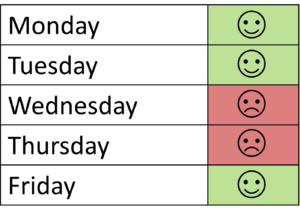
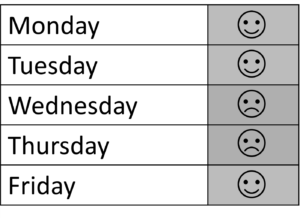
Globally, about 8% of men and 0.5% of women – some 300 million people – experience colorblindness. Of those, 99% have what’s called red-green colorblindness. That means they have extra trouble telling the difference between those two colors. Even if you shared those behavior charts in full color, folks with colorblindness couldn’t tell how the child had been behaving.
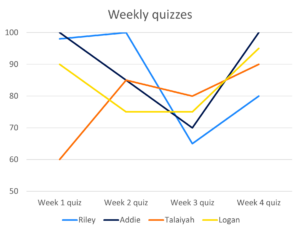
Another example I see often involves using color only when creating charts and graphs. The line graph example below shows students’ weekly quiz scores. Notice how removing the color makes it super hard to tell who each line belongs to. You’ll also note that Logan’s yellow line virtually disappears due to low contrast:

The images below show a couple of ways to “fix” those problems. Just like the behavior chart, they involve adding a little something extra to ensure your entire audience can read the data:
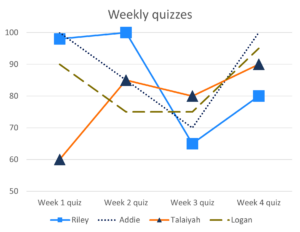
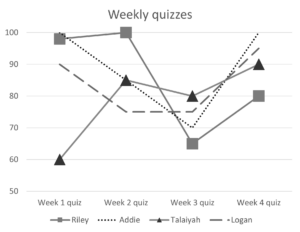
Of course, it’s still acceptable (and encouraged) to use color in your design. The interventions above help your readers but those bright colors also help draw the sighted audience to read and engage with your graph. You’ve just got to make sure that color is not the only way you differentiate your data.
Examples and homework
We’ll use these files during the March 19th session to demonstrate some techniques for fixing common problems in Word and PDF documents. You’ll also remediate a couple of them for homework and discuss them in April!
Example files for work session
WARNING: Due to the nature of the course, these document versions are intentionally not accessible!
- Color contrast & APCA.docx – One page tip sheet that talks about selecting colors with good contrast ratios and a more advance system for measuring contrast.
- Volunteers Needed.pdf – Flyer calling for volunteers for a campus feeding program. Created in Canva.
Homework
Next session, we’ll work through a couple more examples together. Before then, try what you’ve seen and learned! If you get stuck, or if you’d like some feedback, feel free to reach out to me via email, ryan.creech@uky.edu.
Tip sheet
- Using Microsoft Word and my Quick Tip Sheet template, create a one-page tip sheet on an accessibility topic. You can use the resources on this page as a starting point.
- Export your Word document to PDF.
- Check out your document using the PDF Accessibility Checker (PAC). Select the Results in detail button to see how many errors there are.
- In Adobe Acrobat, run Preflight. You can use the built in Fix problems in PDF tagging structure profile or try the custom one that I use!
- Try running PAC again to see what’s been fixed.
- See if you can edit your PDF to be PDF/UA and WCAG compliant!
Your work project
Pick a new project that comes across your desk (or something you’re working on currently).
- Think about the best document format for communicating the information (discuss it with your team if appropriate). What factors did you consider?
- Create the item in your program of choice (Word, Google Docs, Canva, Outlook, WordPress). Use the software’s built-in accessibility features and checkers to see how you’ve done.
- How are you going to distribute the information? Put it into its final form and make sure you preserve the accessible formatting.
Assistive Technology demonstration: Reading the screen with NVDA
Navigating a document using NVDA
This video shows a few of the navigation options available to users of screen readers and other assistive technologies. It also highlights the importance of building documents that are properly tagged and structured.
Ryan’s Steakhouse menu
Watch these two videos to see the difference between accessible and inaccessible versions of the same restaurant menu. The first video has been created without accessibility features. In both cases, I asked NVDA to read the entire document aloud.
Unique, descriptive link text
The videos below show how assistive technology sees link names. The first video shows badly named links; the second video shows improved link text.
Bad link names
Improved link names
Expanded training and resources
Customer Experience Directorate | US Department of Homeland Security
The US Department of Homeland Security’s Customer Experience (CX) website provides free training resources and certificates. Course offerings include:
- Introduction to Customer Experience
- Basics of User Research
- Usability Testing
- The Authoring Section 508 Compliant Documents Program, which includes:
Interested learners can also sign up for the Trusted Tester Training for Web Certification Program. This intensive program of study teaches students to evaluate websites and digital media for meeting accessibility requirements.
Section508.gov
The US General Services Administration maintains Section508.gov, a portal stuffed with free training resources to help agencies meet accessibility requirements. Below is a sampling of courses related to document and media accessibility. To access other accessible electronic document technical resources, visit Accessibility Testing for Electronic Documents.
WCAG guidelines
- WCAG Quick Reference: A very helpful, customizable quick reference to WCAG 2.1 requirements and techniques. WCAG Quick Reference provides a Filter tab to determine which success criteria and techniques are displayed/apply. The Contents tab provides a quick link to requirements with buttons that allow users to “show a full description” of the SC, “show techniques and failures” for the SC and display its “understanding” information.
- Understanding WCAG: A guide to understanding and implementing WCAG 2.1, Understanding WCAG 2.1 contains links to content for understanding Success Criterion, information about how to successfully implement the criterion, and guidance about techniques for developers for success and failure.
Adobe Acrobat Preflight
Remediating a PDF? Adobe Acrobat’s Preflight tool can automatically fix a multitude of tagging and structural issues. It’s really easy to use and makes a lot of the changes you’ll see tagged by PDF testing tools. Adobe has a number of built-in fixups. Using Preflight in Adobe Acrobat is easy:
- In the Acrobat All tools menu, select Compress a PDF.
- Choose Preflight (last option).
- In the Preflight pane, select Acrobat Pro DC 2015 Profiles from the dropdown.
- Double click Fix problems in PDF tagging structure.
- Select a destination to save to (I usually just overwrite the one that’s open) and click Save.
Ryan’s preflight profile
My preflight profile started with the Fix problems in PDF tagging structure. I’ve added a few other fixups over the years. You can download Ryan’s Adobe Acrobat Preflight Profile and use it right away! To install a custom profile:
- Download Ryan’s Adobe Acrobat Preflight Profile to your computer.
- In the Acrobat All tools menu, select Compress a PDF.
- Choose Preflight (last option).
- At the top of the Preflight pane, select Options > Import profile.
- Locate the .kfp file you downloaded earlier. If you didn’t pick a place to save it, you should find it in your Windows computer’s Downloads folder.
- Select the file and choose the Open button.
- Just double-click the name of the profile to use it!